|

the lpi is easier to get use to then the meade
dsi and delivers a great color image. fast and easy makes the lpi
a perfect candidate for planetary and lunar imaging. the software
is also very easy to use. it will take someone a long time to run
out of objects to image with the lpi. i have got some pretty great
images, even with fair seeing conditions using the lpi. i have also
used it with my 4.5" newington and was able to get good results. if
you are just getting into imaging purchasing a meade’s lpi is a great place
to start. i believe every telescope accessory case should have
one of these in it.
manufacture
by = meade
cost = @ $ 149 us dollars
vendor/supplier = www.telescopes.com ( below is the description available
at the time of my purchase 2/2005 which outlines the product)
meade's exciting new lpi (lunar planetary imager) can be used on any telescope
that uses .965" or 1.25" eyepieces for making images. the vga resolution
(640x480) color cmos chip is capable of creating high-quality lunar and
planetary images, as well as daytime terrestrial images. and because the
exposure times can be extended to 15 seconds, even bright deep-sky objects
can be captured. the effective magnification of the camera is similar to
a 6mm eyepiece, and it is often used with a barlow lens for making images
of planets.
autoguiding with the lpi requires an autostar-equipped meade telescope.
cables are included with the autostar suite for linking the pc to the "rs232"
port on these telescopes so that the software can make corrections to the
telescope as the lpi tracks on a star. autoguiding with the lpi is as easy
as making an image. an initial image is downloaded, and one only has to
draw a box with the computer's mouse over the star to be tracked. when used
in tandem with the lx200gps with smart drive activated, stars as faint as
10th magnitude may be used.
making lunar and planetary images with the lpi is fun and simple.
a beginner will find that they only have to do the following to make images
that they will be proud of:
[top of page]
install
the autostar suite software in your pc.
connect
the usb cable to the camera and the pc. windows will recognize the new device
and a dialog box will appear asking if you want to install the new drivers.
with the autostar suite cd disk still inserted in the computer, click "ok".
open
autostar suite, click the "image" drop-down menu at the top of the program
and select "lpi imaging". the camera's dim red l.e.d. "on" light will glow
indicating you are connected.
click
the drop down menu under "object" and select the type of object that you
will image, use "moon" for taking images of the moon for example.
center
up the planet or region of the moon that you wish to image with an eyepiece.
remove the eyepiece from the telescope's focuser, and slide in the lpi camera.
the
image will appear on the "live" box on your computer at this time. you can
now focus the telescope to get the sharpest image. use the "magic eye" tool
of the program to determine best focus.
hold
down the left mouse button and draw a box around a region of interest, and
let go. the lpi will "track" on that region during the exposures.
when
you are ready, just click the "start" button and you will start tracking
and stacking images. you can take and stack as many images as you like.
click
"stop" to finish. the lpi software will automatically name and save your
final image. it is that easy!
as your familiarity of using the lpi software improves, you can over-ride
all of the automatic settings and take control of nearly every aspect
of the imaging process to further improve your imaging skill. for example,
the exposure settings can be user-controlled from .001 to 15 seconds.
 the lpi software automatically aligns multiple images and combines them
into one superior image. since atmospheric seeing will dictate the quality
any single image taken, the lpi software's "min quality" setting can be
set to discard poor quality images and only combine images at or above the
setting chosen.
the lpi software automatically aligns multiple images and combines them
into one superior image. since atmospheric seeing will dictate the quality
any single image taken, the lpi software's "min quality" setting can be
set to discard poor quality images and only combine images at or above the
setting chosen.
[top of page]
other features include taking dark frames with the lpi, or saving every
image taken instead of just the final stacked image. below are most of the
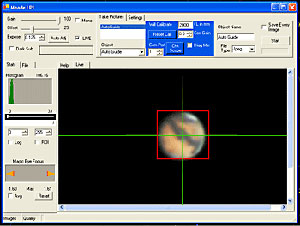
primary features of the lpi software interface for controlling the camera:
live - displays what the imager sees in the "live" tab in the display
area.
exposure - this is the exposure time in seconds (from .001 to 16 seconds),
the up and down spin buttons adjust the exposure up and down by .5 f/stop.
gain and offset - are like contrast and brightness on a tv. these controls
are sent directly to the camera.
histogram - displays a histogram of the image in the live tab. it uses
a monochrome converted image which is an average of the rgb of each pixel.
stretch controls - the sliders below the histogram control the stretch
of the image. the top one is black and the bottom one is white. the numbers
below the sliders are the stretch values. the left one is black the right
one is white.
log checkbox - this makes the histogram response log.
roi checkbox - makes a histogram in the region of interest (roi) of
the red rectangle in the live display area drawn by the user.
magic eye focus - this displays a graphical representation of the focus.
the two orange triangles grow together to indicate better focus. the red
lines indicate the maximum obtained.
avg checkbox - this will average the last 5 focus values to smooth out
the noise in the image.
reset - this will reset the red max indicators of the magic eye focus
tool.
start - this will start co-adding images and continuously display the
current image in the live tab and the co-added image in a new tab with the
filename as the tab. the min quality, evaluation count, object name, and
filter selection will be used for this image. the start button will be relabeled
"stop". when stop is pressed the co-added image will be saved as the file
type selected and in the "image folder" under the object name. if there
is already a file with this name then a number will be suffixed to the name.
[top of page]
min quality - this selects the minimum quality that is acceptable to
co-add an image.
evaluation count - this is the number of images skipped when start is
pressed to determine a quality range.
object name - this is the filename that will be used when the stop button
is pressed.
kernel filter - this will insert the selected kernel filter in the image
stream. when co-adding the image, the filter is applied after the co-add
but is only used for display. it is applied again when the image is saved
such that it is only applied once to the co-added image.
images status - this displays the number of co added images.
quality status - this displays the quality of the last camera image.
centroid - when you draw a rectangle around a bright object in the live
display area, two crossed lines represent the centroid of the rectangle
(roi). the rectangle will move with the centroid to keep it in the middle.
this way it will track the bright spot any where on the image. the centroid
is used by the shift and combine algorithm to determine how much to shift
the image by.
*recommended minimum system for installing autostar suite:
pc running windows 98se with 64 mb and 100 mb free disk space.
credit=description
from telescopes.com pages 3-2005
|